BMW S1000RR Forum banner

How To Install the Rapidbike Evo

25K views 35 replies 14 participants last post by  RATD-R  
#1 · (Edited)
If you are having trouble viewing the pictures, you can view this exact same how-to on the Motomillion Blog by clicking here

Rapidbike EVO is our favorite fuel controller module and it is by far the best product of its kind which is available on the market today. Naturally, this is what we installed on our BMW S1000RR in order to maximize the power gains from the Sprint P08 Filter and the Akrapovic Evolution Line full titanium exhaust system that are already on this bike.

This is a detailed how-to install for the Rapidbike EVO fuel controller module, the bike in picture is a 2015 model year, but installation steps are identical for the 2015 to 2017 model years.

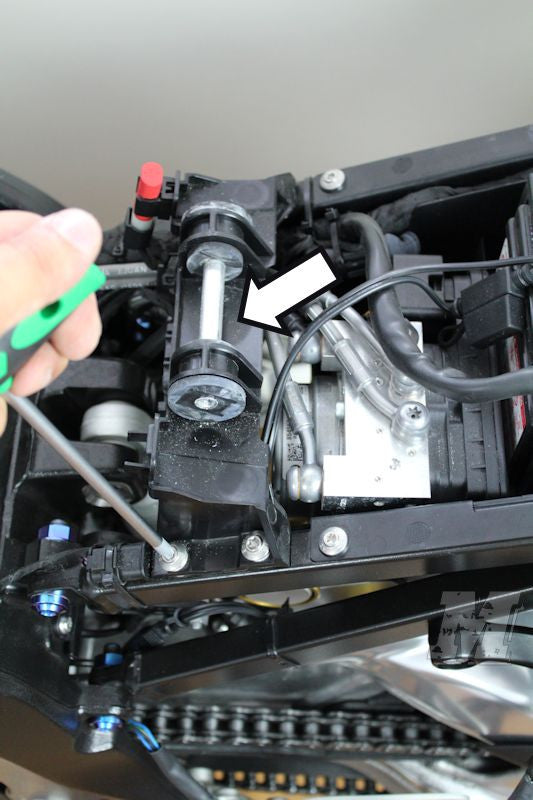
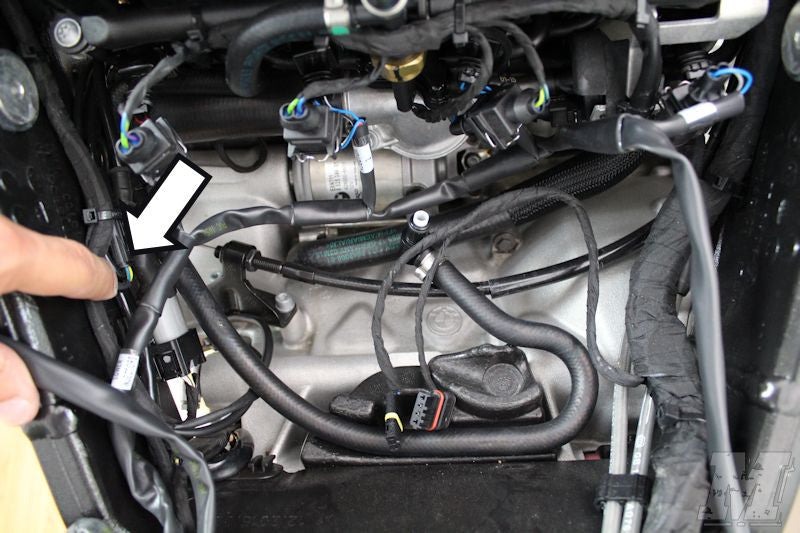
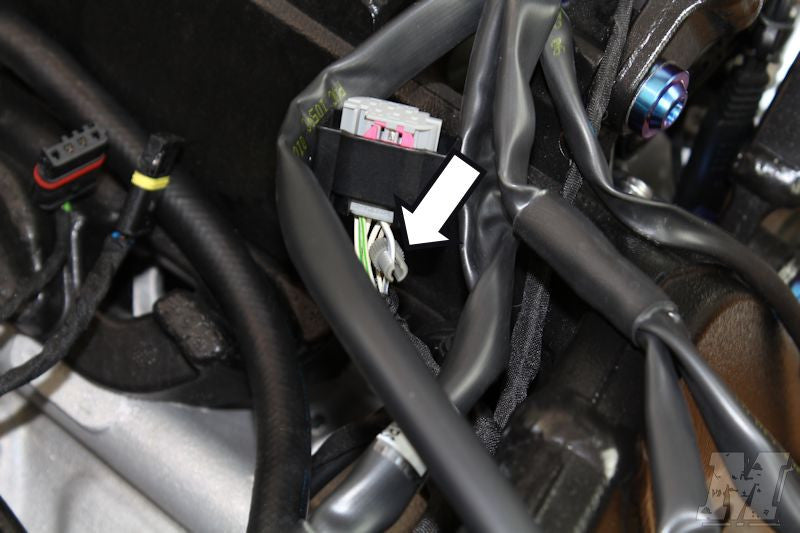
Installation is fairly simple, however you will need to pay attention to the routing of the wires to make sure nothing gets pinched once you start putting the bike's components back together. So while performing the install, try to keep the wiring as neat and tidy as possible.

We recommend having as little fuel in the gas tank as possible before performing this install.

To view the product being installed in our store, here is the direct link > https://www.motomillion.com/collect...bmw-s1000rr/products/rapidbike-evo-fuel-controller-module-for-s1000rr-2015-2017

Tools you will need are:

- T25 Torx Driver
- T30 Torx Driver
- Side Cutter Pliers
- 10mm Socket
- Rag

Let's Begin!

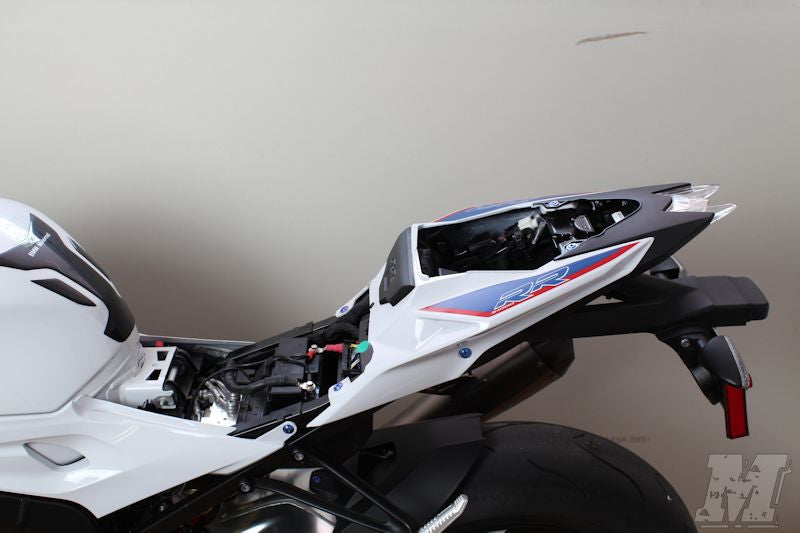
1. Start by removing the side fairings, riders seat, rear seat, tank cover, tank side panels and finally the gas tank. The gas tank has two connectors underneath, and the fuel line comes off when you twist it, make sure to lay a rag underneath the gas tank to catch the gas that will spill from the line once its disconnected.

Image


Image


Image


Image


Image
 
#2 ·
2. Feed the wiring harness into the tail section from the left hand side of the bike. The large orange connector is what the module will connect to, and this is what you want in the tail section, along with the accessory connectors next to it.
Image

Image


Image


3. In order to make room to feed the rest of the wiring harness, loosen the four bolts of the seat bracket which is on the rear subframe.

Image


4. Run the harness under the seat bracket, you can see the Rapidbike Evo harness highlighted in red in the picture below, to give you an idea on how to route it.

Image
 
#3 ·
5. Locate the four lower injectors. Injector #1 will be the left most injector and it continue in numerical order.

Injector #1
Image


Injector #2
Image


Injector #3
Image


Injector #4
Image


6. Connect the Rapidbike Evo harness inline to each injector as numbered on the harness.

Image


Image
 
#4 ·
7. Locate the four upper injectors. Injector #5 will be the left most injector and it continue in numerical order.

Injector #5
Image


Injector #6
Image


Injector #7
Image


Injector #8
Image


8. Connect the Rapidbike Evo harness inline to each injector as numbered on the harness.

Image


9. Locate the 2-pin black connectors for the crankshaft sensor and connect the Rapidbike connectors in-line with the stock connectors.

Image


Image


Image
 
#5 ·
10. Locate the grey, 6-pin connector for the TPS sensor, and identify the wire which is connected to the number 2 pin of the connector. Using the posi-tap connector provided, connect the green wire from the Rapidbike EVO harness to the wire coming out of the number 2 pin of the TPS connector.

Image


Image


Image


Image


Image


Image
 
#11 ·
10. Locate the grey, 6-pin connector for the TPS sensor, and identify the wire which is connected to the number 2 pin of the connector. Using the posi-tap connector provided, connect the green wire from the Rapidbike EVO harness to the wire coming out of the number 2 pin of the TPS connector.
Right on, Manny!!!
Thanks for edumacating/learning me about a neat little component I never knew existed.
This makes me curious why people have commented about soldering while installing Rapidbike, if that neat little jewel is included in the kit?
:smile2:
 
#6 ·
11. Locate the 4-pin black connectors for the O2 sensor on the left side of the bike and connect the Rapidbike connectors in-line with the stock connectors. Use zipties to neatly secure the connectors together as shown in the second picture below.

Image


Image


12. Locate the 4-pin black connectors for the O2 sensor on the right side of the bike and connect the Rapidbike connectors in-line with the stock connectors. Use zipties to neatly secure the connectors together as shown in the second picture below.

Image


Image


13. Locate the 3-pin black connectors for the gear position sensor and connect the Rapidbike connectors in-line with the stock connectors.

Image


Image


14. Double check all the connectors that was just installed in the steps above to make sure everything is connected securely. Start tidying up the Rapidbike Evo wiring harness to make sure the gas tank will slide into place without pinching any wires and/or hitting any of the connectors. Use zip ties to secure the harness at necessary places. In this case, we used secured the upper injector harness at two locations, and the main Rapidbike Evo harness on the left side near the frame.

Image


15. Connect back the two connectors and the fuel line back underneath the tank, and mount the tank into place. Do not force the tank into place if it is hitting any of the connectors or wires, just try to tuck away the wires or connectors and try again. Once the tank is in place, do not forget to reattach the two breather wires located at the front top sides of the gas tank.

Image
 
#7 ·
16. Connect the black wire from the Rapidbike Evo wiring harness to the negative terminal of your battery.

Image


17. Lastly, connect the large connector from the Rapidbike Evo wiring harness located under the rear seat to the Rapidbike Evo module. We tucked away the accessory connectors right under the tool kit spot, and used zip ties to secure the Rapidbike Evo module so that it isn't freely moving around under the seat while riding.

Image


If you've followed all the steps correctly, your bike should now start and the atuo-adaptive feature will start to immediately make requiref adjustments to the tune of your bike.

Once you've verified that the bike starts, re-isntall the side fairings, riders seat, rear seat, tank cover, tank side panels.

:nerd:
 
#22 ·
16. Connect the black wire from the Rapidbike Evo wiring harness to the negative terminal of your battery.

If you've followed all the steps correctly, your bike should now start and the atuo-adaptive feature will start to immediately make requiref adjustments to the tune of your bike.

Once you've verified that the bike starts, re-isntall the side fairings, riders seat, rear seat, tank cover, tank side panels.

:nerd:
If read this correctly this setup does not require a dyno run to tune the software and create a custom map? The software self-tunes?
 
#16 ·
is blocking off the Pair system a must when doing the rapid evo?? or can the rapid tune with the pair system still working??
 
#28 ·
So just to confirm, if I'm going to take the time to do this install, might as well have the PAIR block-offs handy and do at the same time, correct? Even if I'm leaving the stock O2 sensors on? Should I just do the tri-fecta and rapidbike, pair block and wideband all at the same time?

Ahhh, sorry for the confusion and I appreciate the help (even though I don't have ordered the parts yet).
 
#29 ·
Power commander auto tune does not tune as the bike is running. Must accept changes in the software between rides. Rapid bike compares current state to the map and adjusts the custom map as the bike is running to match the base map. Wideband allows specific AFR to be set, narrowband uses three states only. Rich, lean, and optimum.
 
#33 ·
You are welcome. The cables are indeed the trickiest part, however that is not even that hard, one or two tries and if you follow the instructions with staying neat and tidy from the beginning you should be through it in a breeze. :nerd:
 
#35 · (Edited)
Thanks for the guide. Just ordered the Rapidbike Race & And Wideband setup from you today.
Got it installed. Was a major PITA getting the wiring tucked out of the way and looking "factory". I think it took me several hours of zip-tieing and trying different routes to avoid the tank rubbing against anything else.
 
#36 ·
Installed my Rapid Bike today after the full Arrow Evo Comp GP exhaust yesterday. This step-by-step is spot on! Great write-up. Got it all done in about 1.5 hours. Thanks for the pictures and guide!